At some point we’ve probably all written code to draw text to screen manually, using TextOut, ExtTextOut, DrawText or DrawTextEx depending on how complex the required result was.
But have you ever tried to draw fully-justified text, that is, text that adheres to both the left and right boundaries of the destination rectangle? There’s no support in Delphi, and very little support in the Windows GDI. Here’s how to do it.
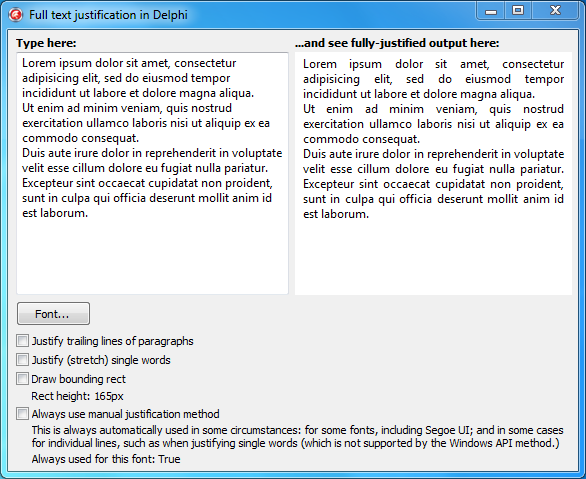
The demo application for this article – type in the memo on the left,
and see the justified version on the right
In this article
Contents
- GDI’s support for justified text and how to use it, where that support breaks down, and justifying text manually in a custom text drawing method.
- Code to print any string with or without line breaks (multiple paragraphs) fully justified, including some justification options to do with handling trailing lines at the end of a paragraph, and lines consisting of a single word.
- A small MPL-licensed open-source unit implementing these techniques.
Why fully-justified text?
First of all, why not? It’s a fun exercise!
Second, text output is an important part of an application’s visual style. A polished professional look is important, and modern styles are increasingly based around ‘blocks’, ie square or rectangular UI elements. If you want your text to form a visual block, it may need to be justified.
In my own user interfaces I have been experimenting with spacing, light fonts (Segoe UI Light and Myriad Pro) and alignment. I would like my text to reflect the alignment of elements onscreen. To do this, and to add to the ‘clean’ feel I am aiming for, I want to print text fully justified to both the left and right edges.
Back to basics – TextOut()
If you often custom-draw text rather than relying on components like labels and memos, you’re probably used to using DrawTextEx. This is the most complicated of the GDI text drawing routines and, personally speaking, my default go-to method since I’ve used it so much.
But one of the more basic methods – and GDI has at least five – to draw text is plain old TextOut. It’s very simple and allows you to specify a device context, X and Y coordinates, and some text, and it will draw the text at that position in the current font. No clipping, little formatting, no multiline support. But it does have one useful feature: its output is affected by something that isn’t mentioned or linked to on its MSDN page: a method called SetTextJustification.
From MSDN:
The SetTextJustification function specifies the amount of space the system should add to the break characters in a string of text. The space is added when an application calls the TextOut or ExtTextOut functions.
In other words, when TextOut draws text, it draws using a specific amount of spacing for the size of a ‘break character’ – that is, when it encounters a space, it leaves a blank area the width of a space. This method allows you to add a tiny bit onto the width of each blank area for the whole piece of text, ie to increase the size of the spaces between words, and you can use the difference between that width and the width of the normally-drawn text to make sure that the text drawn to screen takes up a larger width than it otherwise would.
With the following code painting to a TPaintBox canvas:
1 2 3 4 5 6 | const Lorem = ‘Lorem ipsum dolor sit amet’; ... TextOut(paintJustification.Canvas.Handle, 0, 0, Lorem, Length(Lorem)); SetTextJustification(paintJustification.Canvas.Handle, 20, 4); TextOut(paintJustification.Canvas.Handle, 0, 15, Lorem, Length(Lorem)); |
You will get the following result:
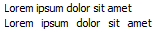
The last two parameters in SetTextJustification (above, 20 and 4) represent the total space to add when drawing, and the number of break characters in the string. Here, it’s adding 20 pixels over 4 spaces, so each space is 5 pixels wider than it would have been normally.
If you know how wide you want your text to draw – that is, the width of the column that your justified text will drawn in – you can use this to make sure the text fits perfectly into that column.
So far so good. But the important part of justifying text is to justify a paragraph – several lines. And each line is going to have different requirements for the spacing between words. Neither TextOut nor ExtTextOut have support for this.
Drawing paragraphs line by line
The normal way to measure text and get feedback about how much text was drawn onscreen in a specific rectangle is to use DrawText(Ex). If you haven’t used it before, these two versions of the function can draw and measure text (that is, see how much space text would take up if it was drawn), with left, right, center, top and bottom alignment, single or multiline, various types of ellipses, various options about where to break text into lines, clipping, several options about tab stops and drawing underscores for & characters, etc. Go ahead and read the MSDN page, it’s interesting reading, and it’s one of those essential functions that you need to know. Not all options can be used together. Even so, it’s a remarkably concise function – a lot of power is squeezed into one small method.
What we want to do is split the text we want to draw into logical lines – that is, given a string and a constraining width (the ‘column’ the text should be justified to), get a series of substrings and widths. Each substring is part of the original string, and each width is the width of that substring when drawn normally, and is less than or equal to the column (justification) width. We can then draw those substrings one after the other, moving down the canvas, and at that point we will have reinvented left-aligned text.
In pseudo code, this would be something like:
1 2 3 4 5 6 7 | RemainingText := Text; while Length(RemainingText) > 0 do begin LengthOfLine = GetNumberOfCharactersOfWholeWordsThatFitOnOneLine(RemainingText); LineText := RemainingText.SubString(1, LengthOfLine); LineWidth := GetWidthInPixels(LineText); RemainingText := RemainingText.SubString(LengthOfLine, end–of–line); end; |
Although DrawTextEx can break words into multiple lines itself, it doesn’t give you information about each line. However, there is an option for it to adjust the input rectangle based on what it successfully drew. The Ex version of the function also has a structure that has a field that it will write the number of characters it successfully drew to. If we ask it to draw a single line and write back what it managed to draw, will we get what we want?
1 2 | DrawTextEx(Canvas.Handle, PChar(RemainingText), Length(RemainingText), Rect, DT_TOP or DT_LEFT or DT_SINGLELINE, @Params); |
No. (In fairness this was a slightly naive first attempt.) This successfully ‘draws’ the whole line, way past Rect’s bounds despite DT_NOCLIP not being set, and writes back to Params.uiLengthDrawn (the number of characters it drew) the length of the whole string. Similarly, and perhaps more what you might expect, if asking for the pixel width by specifying DT_CALCRECT in the above, it will modify Rect to the width of the whole string.
To get the number of characters in one line, you need to trick it slightly: ask it to break at words, but give it a small enough rectangle that after breaking to a new line it can’t draw anything else. A one-pixel-high rectangle does the trick:
1 2 3 4 | LineRect := Rect; LineRect.Height := 1; DrawTextEx(Canvas.Handle, PChar(RemainingText), Length(RemainingText), LineRect, DT_TOP or DT_LEFT or DT_WORDBREAK, @Params); |
This doesn’t modify LineRect but does set the Params.uiLengthDrawn field correctly, to the number of characters that form a substring of RemainingText that it would manage to draw, if it drew.
Then to get the width of that string in pixels, you can call DrawText again with the substring that the last call calculated it could draw, this time passing in DT_CALCRECT. For a single line (and since you’re passing in a substring you know fits in one line, you do have a single line), DT_CALCRECT will modify the right-hand edge of the rectangle to show the width of the text. (For multiple lines, it will modify the bottom of the rectangle to show the height.) However, at this point I ran into a bug: for some substrings, but not all, DrawText’s modification of the rectangle was one to two pixels too small. This caused me some puzzling over why some lines of text, when justified, drew up to two pixels too short or too far. This is not a bug I’ve run into before. Instead, using plain Canvas.TextWidth() gave reliable results. Internally, this uses GetTextExtentPoint32.
At this point, we have a series of lines (strings) and their widths. That means we can now use SetTextJustification to draw each line with a different spacing, in order to justify the text.
Looping over each line, and knowing the height of a line of text, and for each line the length in pixels of that line of text drawn normally, and the number of break characters (ie spaces) in that line, some code like the following inside a loop:
1 2 3 4 | SetTextJustification(Canvas.Handle, Rect.Width – LineLengthPx, NumBreakCharsForLine); TextOut(Canvas.Handle, Rect.Left, Rect.Top + Index * LineHeight, PChar(LineText), Length(LineText)); |
will draw justified text line by line.
An application coded using the techniques so far will be able to produce output like this (on the left a TMemo, on the right the memo’s text drawn justified to a paint box):
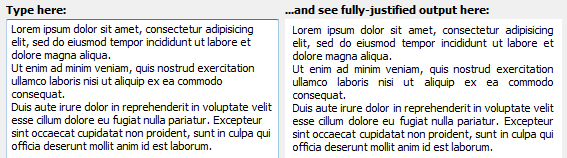
Success!
Problems: the breaking character
This wouldn’t be an article worth writing if it was that simple :)
The above screenshot uses Delphi’s default UI font, Tahoma 8 point. But Tahoma hasn’t been the standard Windows font since Windows XP: these days you use Segoe UI. So, let’s change the font:

That doesn’t look like justified text.
To be clear, this is the same code as above. It worked fine for Tahoma. It also works fine for Arial, Times New Roman, Old English Text MT, and Symbol. Just… not for Segoe UI.
In the above text, I referred to ‘break characters’ and glibly passed by the issue of what they were, conflating them with space characters. After all, most words are separated by spaces. It turns out, though, that the character that TextOut uses as ‘the’ break character, the width of which it will change when you adjust the text justification, is not hardcoded as space but is definable by a font. You can find out which character a font uses via GetTextMetrics; the TEXTMETRICS tmBreakChar character is “the character that will be used to define word breaks for text justification.”
Most fonts define this as a space. Segoe UI defines it as #13, the carriage return character. This means that when TextOut tries to justify text drawn using Segoe UI or one of its variants, the only character it will be able to expand or shrink is the carriage return. This won’t work: it won’t change the spacing of text on a single line.
There is no way to ask TextOut to use a different character, ie to ask it to always use spaces instead of carriage returns. In other words, this font setting breaks justification completely for this font.
So what’s the workaround? Can you call SetTextMetrics to set the character? (No – there’s no such method.) Is there another way to override the break character for a font or device context?
The short answer is no. There is no workaround. Instead, you need to give up on SetTextJustification and TextOut completely.
A custom justified text method
Why use SetTextJustification at all? Well, because it’s there, and an inbuilt Windows API method is probably optimised and faster than any custom method I might write. But if it doesn’t work, then there’s no good reason not to write a method to justify text. Conceptually, as we’ve seen above, text justification is very simple:
- Measure the width of a line of text, printed normally (ie with standard-width spaces between words)
- Calculate the difference between that and that width you want it to be, ie the justified column width
- Print the text word by word, adding a fraction of that width evenly to each space as you go
There are some small caveats: text output on Windows is pixel-aligned, which means adding a fractional space (say, 0.3 of a pixel) is not going to work. A hint about how to handle this is in the SetTextJustification documentation:
Because rounding errors can occur during justification, the system keeps a running error term that defines the current error value. When justifying a line that contains multiple runs, GetTextExtentPoint automatically uses this error term when it computes the extent of the next run, allowing TextOut to blend the error into the new run.
Thus a possible algorithm is something like the following:
- Calculate the difference in normally-printed width, and the justified column width
- Calculate the number of spaces (or whichever break character you use) in the string
- Calculate the extra width to add per space – that is, the difference from the first step, divided by the number of spaces. This will be a floating-point number (eg, 0.4 pixels)
- Break the string into words, by splitting by the break character
- For each word:
- Print it, and move the current X position ahead by the width of that word
- Move the current X position ahead by the width of the break character (space) plus the extra width to add per space
- Repeat until you run out of words
The second-last step, adding the fractional extra width, is the tricky bit, and can be expanded:
- For each space:
- Calculate the space width in pixels: normal width, plus rounded extra width
- Calculate the ideal width in pixels: normal width, plus extra width
- How far off where this should be is it? Add that to an accumulated error
- Add the rounded error (to get an integer, ie whole-pixel, offset) to the width
- If this changed the width, update the accumulated error by how much it was just adjusted
For context: for small font sizes, as in the above screenshot, the extra width per space will be a fraction of a pixel, say 0.37px. The above algorithm keeps a running error, and as the error accumulates to something that round to a whole pixel, add it. For example, for a constant extra space of 0.37px: the first space and first error is 0.37, which rounds to 0; the second time it’s 0.37+0.37=0.74, which rounds up to 1pixel so shift the next word ahead by 1px, but with an error now of -0.26 since we adjusted too far; the third time, -0.26 + 0.37 = 0.11 which rounds to 0; the fourth time, 0.11 + 0.37 = 0.48 which rounds to 0; the fifth time 0.48 + 0.47 = 0.85 which rounds to 1, so add 1 pixel, but with an error of -0.15 since we moved too far; etc.
You can in fact adjust the rounding mode via SetRoundMode: this affects where the fractional amount is added. From experimentation, the default rounding mode (banker’s rounding) gives the best visual results.
1 2 3 4 5 6 7 8 9 10 11 12 13 14 15 16 17 18 19 20 21 22 23 24 25 | BreakSize := Canvas.TextWidth(BreakChar); Words := SplitString(LineText, BreakChar); if Length(Words) <= 1 then begin TextOut(Canvas.Handle, X, Y, PChar(LineText), Length(LineText)); end else begin BreakAddition := SpaceToFill / Pred(Length(Words)); // Amount to add to each space/breakchar BreakAdditionInt := Round(BreakAddition); BreakFraction := (BreakAddition – BreakAdditionInt); AmountOff := 0; CurrentX := 0; for Index := Low(Words) to High(Words) do begin TextOut(Canvas.Handle, CurrentX, Y, PChar(Words[Index]), Length(Words[Index])); CurrentX := CurrentX + Canvas.TextWidth(Words[Index]); Space := BreakSize + BreakAdditionInt; // How far off where this should be is it? AmountOff := AmountOff + BreakFraction; // Maybe some of this can be added to the space for the next word AmountOffInt := Round(AmountOff); Space := Space + AmountOffInt; // Adjust for how much this changed the amount off (may have gone too far, eg if rounded up) AmountOff := AmountOff – AmountOffInt; // Finally, shift by the width (space is the break char width plus adjustment amount) CurrentX := CurrentX + Space; end; end; |
What results does this give with Segoe UI, passing in space (‘ ‘) as the break character to use?

Fantastic! That’s fully-justified text in Segoe UI.
Tweaks and improvements
At this point you could write your own justified text drawing code. There are some improvements you might want to make to the above code, which was cut down for clarity, but the above includes all information required to write functioning code.
But now that we have a custom text justification method and are no longer limited by the capabilities of the Windows method, there are a few other justified text output options we might want to consider:
- What about the trailing lines of paragraphs? A simple implementation will not treat trailing lines any differently to a normal line, so the last line of a paragraph will be expanded to meet both sides too. You’ll notice in the above screenshots this doesn’t happen, and that’s because my code that splits text up into lines is aware of trailing lines and includes some logic about when to justify and when to simply print normally. But what if you do want trailing lines to be justified, so the text forms a visual ‘block’ regardless of the amount of text on the last line?
- What about when a line contains only a single word? All the code so far adjust spaces between words, but a line of a single word has no spaces and so the word will print on the left, with a gap to the right. That may not be the look you’re after.
The first is easy to deal with: in your code that splits a string into lines, include logic about whether a line should be justified or not, based on testing if it is the last line of a paragraph.
The second:
Justifying a single word
The code as it stands can justify a line, where ‘a line’ is a collection of words and a known break character width between each word. The break character is customisable, but normally a space character. To justify a single word, then, we want to behave very similarly: have a collection of letters, not words, and with a 0-pixel width between them (or rather, whatever width the text render would normally put between letters.)
The easiest way to do this and reuse the existing code is to split the single-word line into characters, where each character is a “word” that the justification code prints. To separate the characters use a zero-width space as the break character. The code will then output each letter with the only space between them being the adjustment.
Reflection: where have we got to?
We can print:
- Justified text
- Choose to justify or left-align the trailing lines of paragraphs
- Choose to justify or left-align individual words
Using a combination of Windows APIs, and a fallback custom method.
The results of this are:

On the left: normal text.
In the middle: justified text, with normal trailing line and word printing.
On the right: both trailing lines and individual words are also justified. (These are two independent options both turned on at once.)
Not bad!
A small open-source unit for printing justified text
This is actually quite a lot of code, especially once custom justification printing starts to be included with the other options about trailing lines and individual words. I have written a small open-source unit which implements all of the above.
The unit contains a single externally accessible method:
1 2 | procedure DrawTextJustified(const Canvas : TCanvas; const Text : string; var Rect : TRect; const Options : TDrawTextJustifiedOptions); |
Pass in a canvas and a string to print, which can include line breaks, and a rectangle to print in. The options are:
1 2 | TDrawTextJustifiedOptions = set of (tjJustifyTrailingLines, tjJustifySingleWords, tjMeasureOnly, tjForceManual); |
The first two are self-explanatory. The third, tjMeasureOnly, adjusts the bottom of the passed-in Rect to the size the text would take if it were printed. It is similar to using DrawText with DT_CALCRECT. The fourth, tjForceManual, is not necessary to pass. Internally the code switches between the Windows API method and the custom justification method in a number of situations: if the font doesn’t support justification (like Segoe UI), if single words need to be justified (which relies on a custom break character), etc. Normally you don’t need to worry about this, but passing this option forces it to always use the custom justification method and never use the Windows API method.
You can find the Google Code homepage and source, and the canonical Justified Text info page.
The code is licensed under the MPL, and you are welcome to use it in your own applications. I look forward to seeing the UIs you create with it!
Leave a Reply