

- Non-rectangular drawing
- Handling GDI’s clobbering of the alpha channel
- Better use of per-pixel alpha (based on what’s drawn, which is more useful than a horizontal gradient)
- Introduction of the TTransparentCanvas class: a TCanvas-like class allowing you to draw rectangles, ellipses, text etc as you normally would, including using TPen, TBrush and TFont. It composes the layers of drawing as you go, building a per-pixel alpha-aware image. It also allows you to draw on glass – something VCL applications traditionally have trouble with.
Previous posts in the series:
If you’re not very familiar with GDI and alpha transparency on Windows, including the intricacies of using AlphaBlend and its BLENDFUNCTION parameter, please (re-)read those before continuing. Content in this post refers to classes and techniques introduced in the first two articles.
Part 1 ended demonstrating per-pixel alpha applied over a rectangular image:
Every pixel of the bitmap is drawn to (it is a rectangle!) That’s useful for a plain rectangular selection, and maybe other simple purposes. But what if you want to draw more complex shapes – an ellipse or a rounded rectangle or text? Suddenly, not every pixel in the bitmap is a pixel of interest.
Suppose you draw text to your bitmap. GDI is not alpha-aware: just because it’s a 32-bit bitmap doesn’t mean it will set the alpha value to anything. How do you know which pixels on the bitmap are ‘of interest’, i.e. should have an alpha value because they were written to and you want them to be visible, and which are not and should have an alpha value of 0?
Handling GDI’s clobbering of the alpha channel
In fact, GDI doesn’t just take a four-byte pixel and set the three RGB bytes. It sets all four bytes, and resets the fourth – the alpha byte, which to it is unknown or reserved – to 0. This means that if you draw to a 32-bit bitmap with standard GDI calls (rectangles, ellipses, text, etc) even though it will have a colour, when the transparent bitmap is drawn or blended those pixels will be invisible. Conversely, if you initialise your bitmap to have an alpha value for all pixels, your GDI output will leave a hole in your bitmap’s rectangle, like this:
 |
| Drawing a rounded rectangle using RoundRect on a transparent bitmap with pixels initially set to $ffffffff (opaque white), and then alpha-blending it over another image. That rounded rectangle is actually blue with a thick edge in another colour. Really. |
You might have spotted from the above how to do it. GDI setting the alpha to 0 is a flag – start by initialising your bitmap to non-zero-alpha values, and then after all the GDI calls, invert the alpha: where it does have non-zero alpha (it was not written to by GDI), set the alpha to 0; where it does not have non-zero alpha, that is, it has an alpha value of 0 (indicating it was written to be GDI), set it to your alpha value of choice.
This requires looping through the entire bitmap, which, as mentioned in part 1 ½, is the main performance problem area with transparent bitmaps. I’ll address how the transparent canvas class handles this later.
Part 1 introduced a record to represent a transparent pixel, called TQuadColor. At the time I mentioned the definition of it I gave was incomplete. Here is the full record:
1 2 3 4 5 6 7 8 9 10 11 12 13 14 15 16 17 | TQuadColor = record constructor Create(Color : TColor); procedure Clear; function WrittenByGDI : Boolean; procedure SetAlpha(Transparency : Byte; PreMult : Single); function AsColorRef : COLORREF; procedure SetFromColorRef(Color : COLORREF); case Boolean of True : (Blue, Green, Red, Alpha : Byte); False : (Quad : Cardinal); end; PQuadColor = ^TQuadColor; PPQuadColor = ^PQuadColor; |
The key addition is the method WrittenByGDI:
1 2 3 4 | function TQuadColor.WrittenByGDI: Boolean; begin Result := (Alpha = 0); end; |
After writing to a 32-bit bitmap with GDI calls, you need to loop through the bitmap and fix up the alpha. Something like this will do the trick:
1 2 3 4 5 6 7 8 9 10 11 12 13 14 15 16 17 18 | procedure TAlphaBitmapWrapper.ProcessTransparency(const Alpha: Byte); var Loop : Integer; PreMult : Single; PQuad : PQuadColor; begin GdiFlush; // Need to flush before any manipulation of bits PreMult := Alpha / 255.0; PQuad := FQuads; for Loop := 0 to FWidth * FHeight - 1 do begin if PQuad.WrittenByGDI then begin PQuad.SetAlpha(Alpha, PreMult); end else begin PQuad.Quad := 0; end; Inc(PQuad); end; end; |
This is a method in TAlphaBitmapWrapper, an internal class used by TTransparentCanvas to manage a 32-bit bitmap. FQuads is a pointer to TQuadColor, the array of pixels, cast from the pointer filled by CreateDIBSection.
Example of better use of per-pixel alpha
So, if we run the above code on the 32-bit bitmap after drawing the rounded rectangle using an Alpha value of 128 (50% transparent), what does it look like?
 |
| The same rounded rectangle as above, but with processed alpha. |
Not bad!
A note about efficiency
Looping through the entire bitmap and changing every pixel is an expensive operation. However, you have to loop over this entire bitmap anyway, in order to premultiply the alpha. That is, the loop must run anyway: the extra check for clobbered alpha values adds very little extra overhead.
The code I’ve written to loop (ProcessTransparency, above) doesn’t optimise hugely – in fact, it could probably be optimised quite a bit more. Instead the canvas takes the approach of minimising the size of the bitmap that needs to be looped through. When you draw, that item needs to be blended onto the canvas – the final working bitmap. (Otherwise, if you draw directly to your working transparent bitmap, drawing will overwrite what was already there – the transparent canvas needs to be able to draw many objects over each other, with individual transparency, so you can see one shape through another.) To do this the TTransparentCanvas class draws each object on a temporary bitmap, and blends that bitmap over its working image.
If you are drawing a rounded rectangle, for example, instead of drawing on a bitmap the size of the actual canvas, it creates a bitmap only the size necessary for the rounded rectangle. That small bitmap is looped through and processed, and it is then blended at the appropriate coordinates so the rectangle appears at the right position. This technique is used for all shapes, including text.
In practice, this works rather well.
If you use a transparent canvas in your program, I recommend not destroying and recreating it each time in your FormPaint or other painting method. Instead, draw once and blend many times – blending is a comparatively cheap operation. Only destroy and recreate the bitmap if it really needs to be redrawn, such as if the size of the bitmap changes.
The TTransparentCanvas class
I’ve been hoping to publish this code for quite a while, and I hope you find it useful!
This is a TCanvas-like class wrapping all the above, and (hopefully) making drawing transparent objects very simple. It is in fact a small family of classes:
TCustomTransparentCanvas = class(TPersistent) – contains most of the implementation, and has child classes:
- TTransparentCanvas = class(TCustomTransparentCanvas) – create one of these, normally, or use:
- TTransparentControlCanvas = class(TCustomTransparentCanvas) – as an analogue to TControlCanvas.
To use, create a TTransparentCanvas instance. Draw to it. When you are done, draw it to a normal TCanvas: it will blend over the existing contents of the canvas. The class follows a similar interface to TCanvas, including Font, Brush and Pen properties, Pixels and RawPixels array-indexed properties (the raw pixels are the premultiplied-alpha pixels in the working image, which is the format AlphaBlend expects; plain Pixels gives you a non-premultiplied colour that you can read to extract red, green, blue and alpha values from.) The main difference is that most drawing methods contain an extra parameter, which is the alpha value of the object they are drawing. This has a default value of 255 (opaque) if it’s not specified.
To be clear: objects are composed. Draw each object with a specified alpha, and it will be blended over the others. You can draw each object with a different alpha value. The final result can itself be drawn to a canvas, possibly with a specified alpha value itself if you want – this draws the composited image, applying an optional alpha for the whole thing.
How to use it
Here is an example, drawing the above rounded rectangle and some text to a paintbox:
1 2 3 4 5 6 7 8 9 10 11 12 13 14 15 16 17 18 19 20 21 22 23 24 25 26 27 28 | TransCanvas := TTransparentCanvas.Create(PaintBox.Canvas.Handle, PaintBox.Width, PaintBox.Height); try // Normal text TransCanvas.TextOut(10, 20, 'This is TextOut', 96); // Clipped text TransCanvas.TextRect(Rect(5, 5, 150, 15), 'Test clipped text in a rectangle', 128); // Draw glowing text (Vista+ text with a hazy background of 4 pixels // radius) if possible TransCanvas.Font.Color := clBlack; if TransCanvas.CanDrawGlowText then // Omitting optional Alpha parameter TransCanvas.GlowTextOut(60, 50, 4, 'Test glowing text'); // A rounded rectangle TransCanvas.Pen.Color := clWhite; TransCanvas.Pen.Width := 5; TransCanvas.Brush.Color := clBlue; TransCanvas.RoundRect(Rect(150, 150, 420, 300), 50, 50, 128); // Key method: draw to the paintbox's canvas TransCanvas.DrawTo(0, 0, PaintBox.Canvas, PaintBox.Width, PaintBox.Height); // Or if you want to draw the whole thing partially transparent - this // is good for fading something in // TransCanvas.DrawTo(0, 0, PaintBox.Canvas, PaintBox.Width, // PaintBox.Height, 128); finally TransCanvas.Free; end; |
As you can see, it is very similar to using a plain TCanvas, except that you must remember to call DrawTo at the end.
What about glass?
Excellent question. TTransparentCanvas is perfect for drawing to a glass area of a form, too. Instead of calling DrawTo, call DrawToGlass in your FormPaint method:
1 | TransCanvas.DrawToGlass(0, 0, Canvas.Handle); |
Yes, that’s as complicated as drawing to glass gets :)
Demo program
I have written a small program to demonstrate using the class. I must emphasise that this is not high quality code: it’s knocked together for demonstration purposes only, and does a few odd things for the purpose of extracting and displaying information about the canvas’s state in a panel. Please don’t evaluate my coding style by this program :)
The demo looks like this:
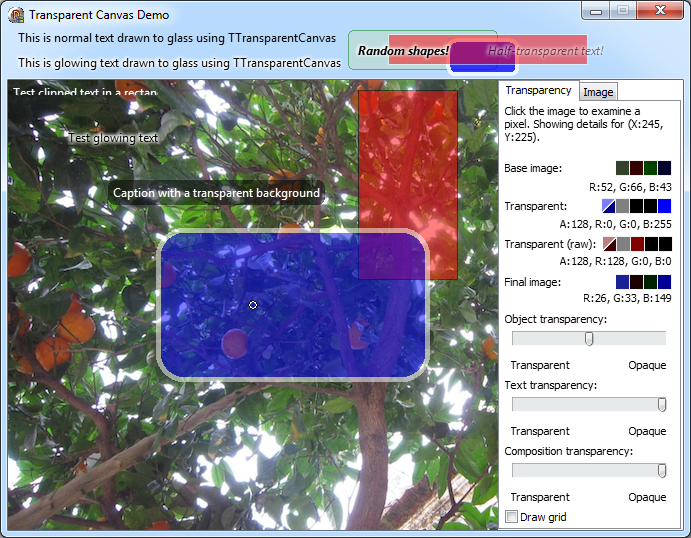 |
| The TTransparentCanvas demo program |
This demonstrates several things:
- In the FormPaint method, a transparent canvas is drawn to the glass area of the window at the top. On this transparent canvas is drawn normal text, glass or glowing text at two different transparencies, and a few random shapes of various transparencies.
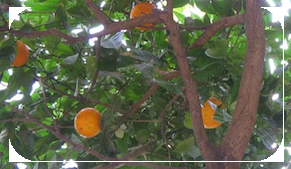
- The rest of the form is mostly made up of a paintbox. In its paint method, it first draws an image you may recognise from this blog (a photo from underneath an orange tree which I took in Lisbon a couple of years ago.) Over this it draws a rectangle, a rounded rectangle, glowing text, text clipped to a rectangle, and a ‘caption’ – that is, a rounded rectangle with text over the top of it (a good technique I find for drawing legible text over an image.)
- In the centre is a small circle, and this surrounds a pixel which is shown in detail in the panel on the right. You can click anywhere on the image to examine any pixel.
- The panel on the right shows the base image colour of that pixel (that is, the colour of the picture of the orange tree); the transparent colour (reading from the transparent canvas’s Pixels property, these are the non-premultiplied RGBA values of the transparent canvas at that pixel); the raw pixels (the premultiplied values, i.e. the pixel value as it actually is stored inside the canvas); and the final blended pixel colour of the whole image, transparent canvas and underlying image, blended together.
- The three sliders control the alpha values for various parts of the drawing. The first controls the transparency of the non-text objects (rectangles and rounded rectangles) – as you can see, it’s set about halfway, and the rectangles are half transparent. The second does the same, but for all the text. the third is different: it controls the alpha of the transparent canvas as whole, when it is blended onto the base image. Move this to simulate fading the canvas in or out.
- There is also a grid, which I found a useful debugging tool to ensure objects were being drawn where they were supposed to be.
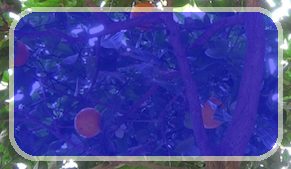
The second tab allows you to choose a different background image, and also has a button to save a portion of the image to a file (probably not worth using, I added it for some images in Part 1 of this series.)
Download the code
The code including the demo program is hosted on Google Code. It is under the MPL license, which I hope is free and lets you make good use of the classes. It is without warranty of any kind – use it at your own risk (this includes the compiled EXE demo.) The class is not finished – it needs implementation for some methods, such as drawing ellipses and lines, to give it all the methods that TCanvas has. Please feel free to contribute these if you feel like it.
The demo program is not something I am comfortable with as an example of coding style. The TransparentCanvas.pas file, on the other hand, is, with the caveat that it’s been a long time since I last wrote anything substantial in Delphi. In fact, one reason I wrote this was to get back into Delphi, including the differences in how Delphi code is written compared to C++ or other languages. I like learning, so feel free to critique it, including if a new language feature added since D7 or so allows the code to be written more elegantly, simply, or concisely.
You can find a compiled EXE of the demo here: http://code.google.com/p/transparent-canvas/downloads/list
And you can browse the Subversion repository here: http://code.google.com/p/transparent-canvas/source/browse/ or check it out following the instructions here: http://code.google.com/p/transparent-canvas/source/checkout
It has only been tested with Delphi 2010 (32-bit) but I don’t know of any reason why it shouldn’t work with newer or older versions.
Have fun!
You must log in to post a comment.