Contents
- How to get started with unit testing in Delphi
- How to test a real-world method (based on something I wrote and tested some time ago)
- How to use test-driven-development practices when writing the tests and method
- How to use TestInsight, which greatly helps TDD workflow in Delphi
Let’s get started.
What are unit tests?
You have code. It does stuff. You think its output is correct. How do you know?
Sure, you might have QA staff testing the product, but they are unlikely to test a specific bit of code. Rather, they will test a UI that runs code that runs code that runs code that runs your specific bit of code. You might have regression tests, too, but they have the same problem. In addition, both these probably run the code in question giving its parameters only a small amount of their possible variation in values – in other words, no matter even if the code you wrote seems correct under some circumstances, you can’t be sure that it’s correct under all circumstances it is designed to handle.
Unit tests are a way to write code that tests code. You write a set of tests for a class or method which compare the code’s behaviour or results to expected or ‘known good’ values, and these tests run constantly (perhaps once a day, or once every commit, or as we’ll see even once every time you click Save or pause coding.)
If someone introduces a bug in the code a month or year away, the unit test will fail because the code’s result for one or more tests is now different from the known good result(s). In addition, because you’re testing one specific bit of code, you can design the tests to cover the entire range of possible legal – and illegal – parameter or input values the code is designed to handle, as well as the entire range of the code’s behaviour.
This gives you:
- Comprehensive tests of a specific bit of code
- Immediate information when code breaks (not weeks away when QA, hopefully, notices)
- A clear test case to use when the code breaks (rather than QA trying to figure out a simple set of actions to make the code break, you already have a few lines of code that were designed to make it break.)
The benefits are clear, especially given the immediate knowledge that a bug has been introduced combined with a reproducing test case. The expense of fixing a bug grows exponentially the further away it is discovered from when it was introduced, and so knowing early is invaluable. You can measure this cost, or the savings brought by having good tests, in dollars – often, thousands of dollars.
In addition, if you need to refactor or otherwise change the code, you the coder can have confidence in your changes. That’s not monetary, but it is nice.
Test-driven development
‘Awesome!’ you say. ‘I’ll write tests for everything! Just let me write the code first and I’ll go back and add them…’
This is the wrong way around. Why?
- If you’ve already written the code, you will probably end up skimping on the tests. Writing tests can, frankly, be boring. Retrofitting them is even worse: incredibly boring. When you’re adding tests to existing code, it’s easy to add only one or two out of either boredom or confidence in your code’s correctness, and not comprehensively test it.
- One thing that can help or motivate here is to remember that even if your code is correct now, it may change to be incorrect in future. Tests are protection against that. Be thorough.
- To be sure your tests are correct, you test against known values. How do you know those values? What you should not do is see what your code currently does and use those results as the ‘known good’ values. That tests code against itself. You should test against results that are independently arrived at.
When writing code, you don’t normally jump straight into the code. Even if you’re a solo developer and don’t write spec documents and have a formal signoff process, you spend some time thinking about the code you’ll write before you write it.
Test-driven development is an extension of this because you also think about the code’s behaviour, before you write it.
The idea is simple, and it will be demonstrated in practice very shortly. Briefly, the idea is to write your tests before you write your code, writing tests for each facet of the code, and including what the code is supposed to produce (eg, a method’s result given certain parameters.) These tests fail, because you haven’t yet written the code. Now, once you have a comprehensive set of tests, against known good behaviour you’ve figured out in advance, you write your code. As you write it, the failing tests will start to pass.
If you think of other tests later, again you add those tests first before making any changes to the code required to ensure those tests pass.
Finally, once you have passing tests with minimal code, you can go ahead and refactor and rework the code. Breaking changes will break the tests. Thus, TDD is often given as a set of three steps:
- Test
- Code
- Refactor.
TestInsight, by the way, is an aid to TDD because it shows test results inline in the IDE, right next to your code, and can be configured to run tests and update the test results all the time, which means that you can see the status of your tests change as you type.
But we’ll get to that later. Enough discussion – let’s write some code! I mean, let’s not write some code, let’s write some tests and then write some code.
What to implement?
A common equation used in some scientific and engineering fields is the following:
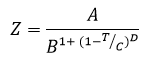
For a specific chemical, described by four constants, this takes a temperature in degrees Kelvin inside a known range for which this equation is valid, and returns a value specifying something about its physical behaviour. (Actually, it calculates the density of a specific chemical in its liquid phase at temperature T, but I mention that only to satisfy your curiosity; it’s not really important for this article.) Of course, the values it returns must be correct.
Two things to note:
- “Temperature inside a known range for which this equation is valid” immediately suggests something to test – let’s test the output given a variety of temperatures in this range
- “A chemical described by four constants” also suggests that possibly it should be tested for several very different chemicals (and thus constants)
Writing initial tests
Start Delphi, and go to File > New > Other. In the Unit Test section on the left of the dialog, select Test Project. (Note you can edit the File > New menu so these two unit test options are always present and are easier to get to.) Click Ok, and in the wizard that appears give it a sensible project name. The source project field should be left empty this time – this allows you to generate test stubs for classes in an existing project, but we’re starting from scratch. Click Finish.

Creating a new DUnit test project
The project is currently empty and so we need to add a unit to contain tests. We can’t use File > New > Other > Unit Test > Test Case because the wizard only creates a unit test unit if you give it existing code to start with (a bad thing) so we’ll do it from scratch: add a new blank unit, and give it the following contents:
1 2 3 4 5 6 7 8 9 10 11 12 13 14 15 16 17 18 19 20 21 | unit EquationTest; interface uses TestFramework; type TEquationTests = class(TTestCase) protected procedure SetUp; override; procedure TearDown; override; published end; implementation initialization TestFramework.RegisterTest(TEquationTests.Suite); end. |
We’re using DUnit, because it is included in all modern versions of Delphi. In XE8, you can also use DUnitX out of the box.
This class descends from TTestCase, which means a number of things:
- You have a number of methods available that act like assertions, that you can use to check specific things – that a value equals its expected value, than an exception is thrown, etc. The names of these methods all begin with Check, eg CheckEquals.
- Because of the line in the initialization statement, all published methods in TEquationTests, each of which is a test, will be run automatically by the ‘test runner’, which is part of DUnit and is responsible for, oddly enough, running the tests. This means that all you have to do to add a new test is to add a new method in the published section.
SetUp and TearDown
SetUp and TearDown are used to create and destroy state that is required to be in place when a test method is run. They are called before and after each test method. Tests should run independently – that is, they should not depend on any other test already having been run. This is because firstly, it makes debugging test failures more difficult: the test is no longer something isolated and with a simple (one method) reproduction case; and second because all test runners, including DUnit and TestInsight, allow you to run only a subset of tests at any one time, which can be useful when you’re focusing on one area. So, keep your tests independent, and if they do require state, set it up and destroy it in the appropriate Setup and TearDown methods.
The code we’re writing doesn’t really have any required state but to demonstrate their usage I’m going to write it so that it does. Let’s do this by having the equation we’re implementing be an instance method of a class, so that you have to have an instance in order to call it. Let’s call this class TInterestingEquations (if this was not an article, it would have many more than just one equation) and add a field of this type to TEquationTests, and create and destroy it in the setup and teardown methods.
This doesn’t compile, and that’s good, because not compiling is a form of tests failing. But it’s a bit inconvenient, so go ahead and make a unit containing a TMyEquations class, and add it to the uses list.
If your copy of XE7 is like mine, when you compile you will find Delphi has mangled your project file and the uses clause has become ‘ususes’ and the resource include statement has lost its opening ‘{$’ symbols. Go ahead and fix it. You need DUnitTestRunner and your two units (EquationTest.pas and InterestingEquations.pas) to be in the project’s uses clause.
Go ahead and vote for the Quality report about this while you’re at it.
Tests
At this point we can write some tests. For my particular chemical, I know the valid temperature range the equation gives sensible results for is 280 Kelvin to 550 Kelvin. I also know the constants that describe this chemical: 0.08745, 0.25984, 550.0, and 0.29643. Let’s put these as constants somewhere.
1 2 3 4 5 6 7 | const MinT = 280; MaxT = 550; A = 0.08745; B = 0.25984; C = 550.0; D = 0.29643; |
A good initial test will test a range of values – say, ten, it’s up to you – between the minimum and maximum temperatures. So let’s sit down and write a test that does this. Remember to put it in the published section.
1 2 3 4 5 6 7 8 9 10 11 12 | procedure TEquationTests.TestTemperatureRange; const NumPartitions = 10; var T : Double; I : Integer; begin for I := 0 to NumPartitions do begin T := MinT + ((MaxT - MinT) * (I / NumPartitions)); CheckEquals(0, FMyEquations.Equation(T, A, B, C, D)); end; end; |
This tests MinT, and MaxT, and actually NumPartitions-1 evenly spaced temperatures in between. It doesn’t compile, which is fine because the tests fail, so go ahead and create a dummy Equation() method:
1 2 3 4 5 6 7 8 9 | uses System.SysUtils; { TInterestingEquations } function TInterestingEquations.Equation(const T, A, B, C, D : Double): Double; begin Result := Double.MaxValue; end; |
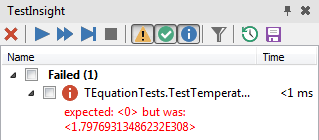
At this point we have one test, which we expect to run (it compiles) but to fail, because it doesn’t do what we’ve written the test to expect – it returns Double.MaxValue, but the test expects 0. (Both these are incorrect because the test itself is not complete yet – we’ll finish that after a brief detour to TestInsight.) If you run the project you’ll see DUnit’s test runner run this test. Click the green Run Selected Tests button and you should see the test run and fail:
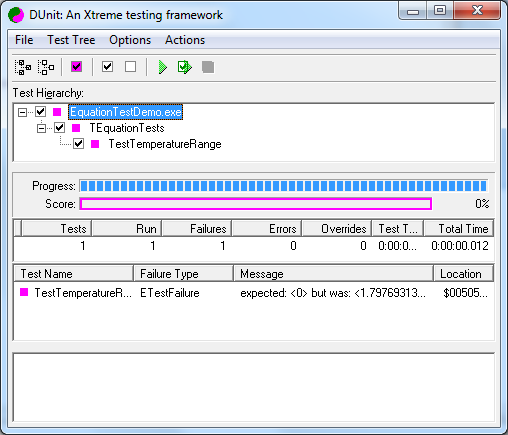
DUnit’s test runner running the one existing test, which fails
At this point you would normally continue writing the test and after that the code, and run the project and click the green button every so often to check on your progress. But this isn’t really very ‘live’; you don’t know the state of your tests until you stop and go and run them. That makes it hard to write using a test-driven development style, where you want to see the effect of your code on your tests as you write. That’s why Stefan wrote TestInsight, and so at this point we’re going to switch and start using it instead.
Using TestInsight
First, download and install TestInsight, and restart the IDE and reload the project.
On the View menu, find ‘TestInsight Explorer’ and click it. Dock the TestInsight window somewhere and save the workspace using the ‘Save current desktop’ toolbar button next to the IDE’s Help menu and workspace combo.

Saving a the desktop layout to include the TestInsight window
To set up TestInsight for use with your project you need to do a few things:
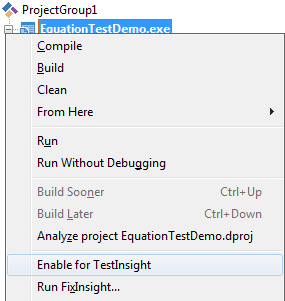
The ‘Enable for TestInsight’ menu item
- Right-click the project, and click ‘Enable for TestInsight’
- This doesn’t actually enable it completely for TestInsight, you need to do some of that manually: specifically, replace the DUnit test runner with the TestInsight test runner. To do this, open the project (.dpr) file by right-click the project and selecting View Source, and replace the DUnitTestRunner uses line with TestInsight.DUnit, and similarly the call to RunUnitTests below. Your project file should end up looking like this:
1 2 3 4 5 6 7 8 9 10 | uses TestInsight.DUnit, EquationTest in 'EquationTest.pas', InterestingEquations in 'InterestingEquations.pas'; {$R *.RES} begin TestInsight.DUnit.RunRegisteredTests; end. |
Now you have a TI-enabled test project. Switch to the TI docked window and click the Run All Tests button on it, the leftmost of all the run buttons. (If you’ve forgotten any of the steps, such as clicking the ‘Enable for TestInsight’ menu on the project, these buttons will be greyed out.) You should now see the same failing test in the TI window.
TestInsight’s version of the same test
How TestInsight helps Test-Driven Development
Once you have TestInsight set up, you would normally make all new unit test project use it right from the start, without detouring via the DUnit runner as we did above. I included that to show the inbuilt unit testing, how to migrate from it if you have existing unit tests, and also to contrast the slow steps of regularly running the DUnit project and running its tests to the slick and immediately-reflective steps of using TestInsight.
We should really not be touching the failing test right now, since we should (by TDD) go and figure out what its correct result values are before even beginning to touch the actual code. However, before doing that let’s see one very cool feature of TI: how it can run tests alongside as you code.
On the TI window, there are two buttons on the far right. One of these looks like a Save icon. Click it, and now TI will compile the project and run tests in the background every time you save. The other next to it is very similar, and runs tests after a short idle period where you haven’t pressed any keys. I personally prefer to run tests on saving, since I save after every code modification by long habit.
Let’s see this in practice. Make sure you clicked TI’s ‘Run tests when the project is saved’ button. We have one failing test, and we want to change the code so it passes. In TInterestingEquations.Equation, change it so instead of returning Double.MaxValue, it returns 0 – currently, the expected result no matter the input – and click Save.
You should see the test results immediately and silently update to show one passing test:

TestInsight, set to run on save, updating to show the newly passing test
The advantages of this should be obvious, especially if you’re using to laboriously running a test project and running the tests every few minutes as you code. You can now see how well your code satisfies the tests live, on the fly, as you type. That means no breaks to run tests, no break out of your coding zen – just keep going and see the results right there.
Let’s revert the Equation() method since we should be writing the tests before the code, and this diversion was just to show one of TestInsight’s features. Make the method return Double.MaxValue again. Click Save, and watch the window immediately show one failing test.
Cool, right?
Back to writing tests
Expected results
Let’s figure out the test results.
The wrong way to do this is to write the code and use the results as the test’s expected values. That tests nothing, especially not that you got the code right.
The right way is to figure out the expected test results first, externally. Depending on what you’re testing you might be able to do this in your head (a MyList.GetFirstItem() method test would test that the returned item is in fact the first, as set up in your Setup method); you might look it up in a reference book if writing an implementation of a known technique; you might figure it out on paper; or you might do what I did and implement the equation in Excel:

Equation implemented in Excel, in order to write unit tests before writing the code they test
However you do it, you get the expected test results first before writing any code. Technically even writing the failing stub breaks this, but in practice it’s necessary to do that just to compile, and so also to syntax-check since Error Insight is broken.
Now we have known test results, let’s put those into the unit test, so we finally have something to test against:
1 2 3 4 5 6 7 8 9 10 11 12 13 14 15 | procedure TEquationTests.TestTemperatureRange; const NumPartitions = 10; Results : array of Double = [1.002427342, 0.969343598, 0.934789909, 0.898453826, 0.859900203, 0.818492308, 0.773233591, 0.722404784, 0.662540758, 0.584220736, 0.336553264]; var T : Double; I : Integer; begin for I := 0 to NumPartitions do begin T := MinT + ((MaxT - MinT) * (I / NumPartitions)); CheckEquals(Results[I], FMyEquations.Equation(T, A, B, C, D)); end; end; |
The tests will still fail, but now the tests are right and so, now we have written the test, we can finally start writing code. Implement the equation:
1 2 3 4 | function TInterestingEquations.Equation(const T, A, B, C, D : Double): Double; begin Result := A / (Power(B, 1 + Power(1 - (T / C), D))); end; |
The tests will still fail, but much closer, with an error like:
expected: <1.002427342> but was: <1.00242734235654>
This is simply to do with the precision we calculated the known results to, which we can test by using an epsilon:
1 | CheckEquals(Results[I], FMyEquations.Equation(T, A, B, C, D), 0.0000001); |
And the tests pass. Great!
Test messages
That test runs a loop. What if the test fails for one element of a loop? All the test message will say is what was expected and what it saw, and from that you will have to back-derive the loop index that failed, and the value of T at that loop.
Instead, let’s ensure those values are included in the failing test output:
1 2 | CheckEquals(Results[I], FMyEquations.Equation(T, A, B, C, D), 0.0000001, Format('I: %d for T: %f', [I, T])); |
Now you can immediately see the information you need to help zero in on what’s failing.
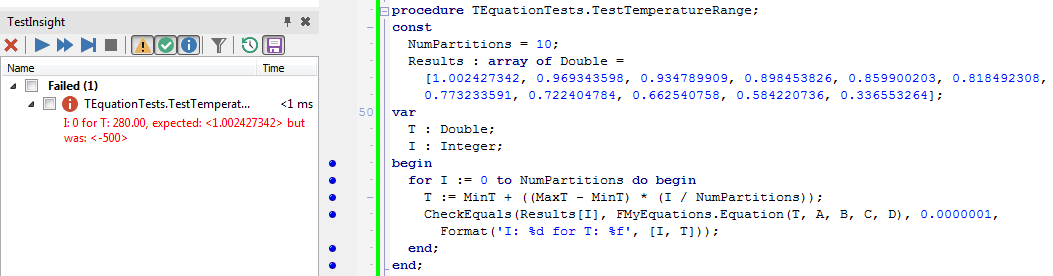
Messages inside Check*() methods help you find exactly what failed
I strongly recommend you get in the habit of annotating all your Check() statements with useful messages – not just for situations like this, but even standalone ones. Messages in unit tests are like comments and can carry dynamic information about the test, its purpose, etc.
Comprehensive testing
After all of this, we have written one test. This is not very comprehensive, and we haven’t done a very good job of testing all possible values. For example, possibly we should test:
- A variety of other chemical constants
- Values designed to make the equation break (eg, calculate the power of an enormous number)
- Out of range values for T, since the equation is only valid for T in a specific range
In fact while the first two are definitely important, until we’ve done the third we can’t claim we’ve implemented the equation properly. If an equation is valid only for specific input, what happens when you pass data outside the valid range? It should fail.
Let’s write the test first.
1 2 3 4 5 6 7 8 9 10 11 12 13 14 15 16 17 | procedure TEquationTests.TestBelowMin; begin FMyEquations.Equation(MinT-10, A, B, C, D); end; procedure TEquationTests.TestAboveMax; begin FMyEquations.Equation(MaxT+10, A, B, C, D); end; procedure TEquationTests.TestTemperatureOutsideValidRange; begin CheckException(TestBelowMin, EEquationInvalidParameter, 'Below minimum value'); CheckException(TestAboveMax, EEquationInvalidParameter, 'Above maximum value'); end; |
Here we are testing that an exception is thrown when the Equation method is called with invalid temperature values. (Define EEquationInvalidParameter in InterestingEquations.pas.) Slightly annoyingly, DUnit only allows you to pass object methods into the CheckException method, not, say, an anonymous method. I’ve only written two methods, but you should test more than the two values of +/-10.
If you run this, the tests will fail with a message:
Below minimum value, expected: <EEquationInvalidParameter> but was: <nothing>
In other words, it expected an exception but nothing was thrown, and so the tests fail.
Now we’ve written the tests, which fail, let’s write the code. Change the Equation method to include the following at the very top:
1 2 | if ((T < 280) or (T > 550)) then raise EEquationInvalidParameter.Create(Format('T is out of bounds: ', [T])); |
And the test passes.
That’s fine, except our solution uses hardcoded values and works only for the one specific chemical we’ve tested for so far. That’s no good, and it shows how non-comprehensive our tests are. We need to do several things:
- Add tests for other chemicals, which will fail because they have different minimum and maximum temperatures. ‘Pure’ TDD adds a test, and then adds only the absolute minimum code to fulfil that test, which we’ve done here. As you add tests you expand the code. Adding more tests with other chemicals will force us to expand or correct the min/max temperature checking code.
- While you’re at it, add tests for math failures given input parameters that will cause floating point errors, tests for negative Kelvin values (since T < 0 is absolutely invalid), etc. Tests that initially fail are good.
- Refactor the test to pass the min/max T values as parameters, and the tests you wrote before you did this will now start to pass
- Probably, given the increasing number of constants being passed to the equation, refactor to pass, say, a Chemical : TChemical instead. You can refactor with confidence because you have a fully passing, quite comprehensive set of tests by now, so any bugs or typos you introduce should cause one or more tests to break immediately.
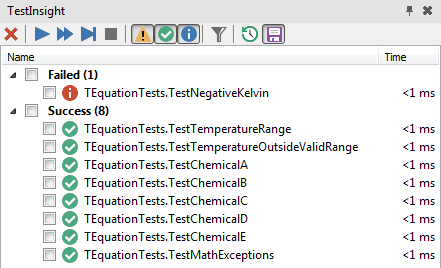
Adding more tests – a good beginning at comprehensive coverage
You can see the TDD flow of writing comprehensive tests, then writing minimal code to fulfil the tests, then refactoring and reworking the code, at work here. You can also see how TestInsight’s immediate, reflective presentation of the test results of your code as you type is immensely helpful, and means you can see the state of your tests and code without pausing and running them separately, which means both responsive and immediate reaction, and without interrupting your coding zen.
Summary
This article has covered:
- What unit testing is: code that tests code
- The basics of test-driven development: write your tests first, code second, refactor third, preferably in a fluid environment that shows your success as you code
- Creating unit tests in Delphi, using DUnit
- Migrating DUnit tests to TestInsight, and how to set up a project for TestInsight
- How TestInsight helps create a fluid TDD workflow
- An example of writing tests before code, figuring out the expected results first (before code!), and then implementing the code to pass the tests, and finally refactoring once tests are in place
- How and why comprehensive tests are important, and several examples of this and of expanding the test suite using TDD practices (test, code, refactor, in that order)
Finally, a shout out to Stefan Glienke for writing TestInsight, a fantastic plugin. Download it here.
You must log in to post a comment.